Whether DIY or professional installation, there are several steps in the Orlando paver installation process you need to know. Here we will 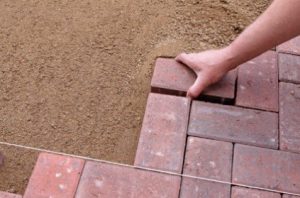 go over three important steps essential to a good installation.
1. Laying Pavers
Lay the pavers in the pattern and design of your plan. Lay them close together. Bedrock Orlando pavers have spacer tabs incorporated into the paver design for proper placement. Using a string line will help to keep the lines of the paver pattern correct.
If pavers need to be cut to size, use a diamond saw, masonry blade, masonry chisel or mechanical splitter.
BE SURE TO USE SAFETY GOGGLES AND OTHER SAFETY EQUIPMENT WHEN CUTTING PAVERS.
2. Edge Restraint
An edge restraint is essential in the long term maintenance of your paved area. If edge restraints are not installed, your pavers will move and separate, ruining your paver project. The paver edge, or border, of your paved area can be done using the same paving material size and color or a paver with a contrasting color or size can be used. This border paver is installed with a heavy mortar bed under it to hold the paver in place. Other edge restraint material can also be used. Edge restraints can be made wood, plastic or metal.
3. Sand Joints
This step involves sweeping sand over the surface which fills up the joints and helps to lock the pavers into place. It is important 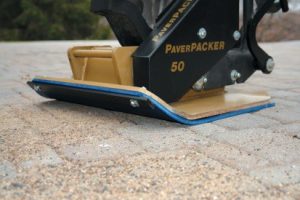 to use fine-grained sand to be able to get sand in to the joints between the pavers. The sand and paver area must be dry to complete this step. Bedrock Orlando has fine sand available for this step.
After all the Orlando pavers are installed, use a power driven plate compacting tamper to help set the pavers into the sand bedding. Be sure to put a thin layer of sand on the surface of the pavers BEFORE using the tamper. A tamper with a rubber compacter pad will help avoid scarring the finished surface.
 info@bedrockorlando.com
 Phone: 407.859.1300
 10500 Rocket Court - Orlando, FL 32824